The motivation for developing Polyglot comes from academic, government, and industrial collaborations that have required research and development into new methods and solutions for the preservation of digital data. At it's origins Polyglot was designed to aid in the preservation of 3D data by providing an empirical means by which to choose an optimal long term preservation file format by measuring and minimizing potential accumulated information loss as one converted from file format to file format. In order to carry out that study a means of converting between any pair of file formats was required. Due to the large number of available/legacy formats, the closed/proprietary nature of many of their specifications, and the complexity of many of the available specifications, the task of directly supporting, i.e. constructing the code the parse or load data from a particular format, for each file format would have been an enormous if not nearly impossible undertaking.
Rather than re-implementing the code necessary to support every possible format an alternative code/software reuse methodology was used. Software utilizing unique and/or closed formats will often support importing/exporting to a handful of other formats to allow users some level of file/data migration out of the software. With most softare designed with an interface tailored for human users, however, this software functionality isn't readily accessible to other programs, a necessity for usage in any system that would serve to explore/preserve large collections of digital data. By utilizing a variety of scripting languages, in particular several tailored towards the automation of graphical user interfaces (GUIs), NCSA Polyglot re-introduces a programmable API like interface to underlying functionality within arbitrary software. Designed for extensibilty and to be horizontally scalable, Polyglot exists as a highly distributed service capable of growing to provide a means of accessing digital content within large collections of heterogenous files.
NCSA Polyglot incorporates conversions for images, 3D models, audio, documents, etc. all simultaneously allowing for further more exotic possibilities for viewing/previewing digital data. In the following sections we describe the installation of a Polyglot server and the various methods by which it can be used. Additional information not contained within this manual can be found on the project website, http://isda.ncsa.illinois.edu/drupal/software/Polyglot/.
## Server Setup
NCSA Polyglot exists within a layered architecture:

At the lowest level of the system is the software reuse layer which provides a uniform API-like access to arbitrary 3rd party software. This layer, shown below, consists of a number of distributed machines running Software Servers. These servers wrap locally installed 3rd party software and make it available to connected Software Server clients.

### Download
The latest version of NCSA Polyglot can be downloaded from:
http://isda.ncsa.illinois.edu/drupal/software/Polyglot/
where both the source code and the latest snapshot can be obtained. The downloaded file polyglot-2.x.0-SNAPSHOT-bin.zip can be unzipped anywhere you like. In the rest of this document we will assume commands are executed from within the extracted Polyglot folder (i.e. polyglot-2.x.0-SNAPSHOT/).
### Updates
The Polyglot package includes a simple auto update utility. To download the latest snapshot release simply double click on the "AutoUpdate.bat" file. The auto update utility will download and extract the latest polyglot-2.x.0-SNAPSHOT-bin.zip file into a temporary directory. From here it will replace all Polyglot files except those designated to not be replaced in the "AutoUpdate.conf" file, indicated by an exclamation mark and a comma separated list of file extensions. Be default it will not update *.conf files, i.e. configurations files, that you will very likely have modified for your local system. New versions of these files will be saved with a ".new" added to the end of them. If you wish to use one of the new configuration files simply rename it, removing the ".new" extension.
### Software Server Setup
Software Servers will run on real or virtual machines that run the 3rd party software you wish to utilize. These machines can be of any platform (e.g. Windows, Linux, Mac). Ideally the installed software should be installed with all the default settings. Once the software is installed the needed wrapper scripts should be obtained and a Software Server should be started.
#### Wrapper Scripts
In order to use 3rd party software a Software Server requires wrapper scripts for the various operations available in the software. The Polyglot folder contains scripts for a number of software packages already. Additional scripts can be obtained from the Conversion Software Registry (or CSR). This repository currently contains information about the conversions available in over 2,000 applications and is currently being populated with wrapper scripts for some of these applications. Scripts can be downloaded manually from the CSR or via the provided ScriptInstaller tool:
```dos
> ScriptInstaller application_name
```
where application_name is a string containing text that will be used to indentify candidate scripts. If several candidate scripts are found the user will be prompted to select one of the possibilities. Downloaded scripts are automatically configured for the local system using the ScriptDebugger tool described in the next section. Users can also write their own wrapper scripts. For a detailed explanation on how to create your own wrappers scripts please refer to the accompanying "Scripting" manual. If a user does write a wrapper script they are encouraged to add it to the CSR.
#### Server Configuration
Wrapper scripts must be placed in the folder indicated in the "SoftwareReuseServer.conf" file. Further, AutoHotKey scripts should be placed in the folder specified by the "AHKScripts" variable, apple scripts in the folder specified by the "AppleScripts" variable, Unix shell scripts in the folder specified by the "ShellScripts" variable. As more script types are supported in the future new variables will also be introduced. Each script path variable can exist multiple times as separate lines indicating multiple folders containing scripts. The differing script path variables can also exist simultaneously in the configuration file, allowing the system to utilize several types of scripts.
Depending on the configuration of the installed software the scripts may need to be modified to use the correct paths of the programs called within the scripts. This can be done by running the ScriptDebugger tool. The tool is used as follows:
```dos
> ScriptDebugger -config path/script_name
```
where the _path_ is the path to the script and _script_name_ is the name of the script we wish to configure to run on this system. The tool has knowledge of various script types and will search through it to find lines that contain calls to executables on the system. When such a line is found it will check to see if that executable exists. If it does it will move on to the next executable called within the script. If it does not exist it will attempt to search for alternatives. This is done by recursively checking all folders specified in the "SearchPath" variable of the "ScriptDebugger.conf" file. This variable takes a semi-colon separated list of paths that should be searched. The tool will search all sub-folders looking for files sharing the same name of the executable. After the search is complete the tool will present the user with a list of files found, allowing the user to choose the correct path to the executable. The successfully configured files are saved to a folder of the same name as the original folder containing the script and "-configured" suffix appended to it. To utilize these configured scripts this new path should be set in the "SoftwareSever.conf" file mentioned earlier.
The following example shows the output of the tool when being run on an already correctly configured script:
```dos
> ScriptDebugger -config scripts/ahk/ImgMgk_convert.ahk
Configuring script "scripts/ahk/ImgMgk_convert.ahk":
checking for C:\Program Files (x86)\ImageMagick-6.5.2-Q16\convert.exe... yes
saving...
```
The following examples shows the output of the tool when being run on a script that is not configured correctly for the current system:
```dos
> ScriptDebugger -config scripts/ahk/IrfanView_convert.ahk
Configuring script "scripts/ahk/IrfanView_convert.ahk":
checking for C:\Program Files\IrfanView\i_view32.exe... no
searching: C:/Program Files (x86)
searching: C:/k3d
found 1 matches:
[1] C:\Program Files (x86)\IrfanView\i_view32.exe
enter choice: 1
saving...
```
To run the tool on multiple scripts simultaneously a wild card can be used as follows to configure multiple scripts of the same extension:
```dos
> ScriptDebugger -config path/*.extension
```
All scripts within the specified script folders will be used by the Software Server unless otherwise specified. To use only a subset of the scripts contained in a script folder one can create a ".aliases.txt" file in that folder containing a list of line separated aliases to use. Script aliases are the portion of the script name that come before the underscore (e.g. "A3DReviewer" for "A3DReviewer_open.ahk", "A3DReviewer_save.ahk", "A3DReviewer_moniter.ahk", etc...).
Before starting the server you should make sure that all remaining parameters in the "SoftwareServer.conf" file are set to valid values for your system:
* **RootPath**
* This folder will be used to store temporary files and is required for the server to run. The default value is set to a relative folder "tmp/SoftwareServer" which should have been created for you when you unzipped the archive.
* **Port**
* The port this server should use. One should make sure that this port is open within their firewall and forwarded correctly if this server will be running behind a router. By default this port is set to 50000 which should be fine (i.e. available) in most cases.
* **MaxOperationTime**
* The time in milli-seconds to wait for a script to complete before killing it and trying again. The default value has been set to 30 seconds.
* **MaxOperationAttempts**
* The number of attempts to make when executing a script after it has exceeded the max operation time. The default value is set to 2, meaning the server will try a scripted operation twice before giving up and moving on.
* **EnableMonitors**
* True if monitor scripts should be run on startup. Monitor scripts are helper scripts that run in the background to catch some of the frequently occurring and un-desired events some applications have (e.g. dialogue boxes asking to send error messages or dialogue boxes confirming whether or not to overwrite a file). By default this is set to true.
* **PolyglotSteward**
* This parameter should be set to the IP address and port of a Polyglot serverís active Polyglot Steward. A Polyglot Steward is responsible for coordinating a number of Software Servers in order to perform conversions. By setting this parameter the Software Server will notify an active Polyglot Server of its existence, allowing the Polyglot Server to automatically acquire this Software Server. By default this parameter is commented out (comments use the Ď#í character). If set this parameter should be set in the form "ip:port".
Once properly configured the server can be started by double clicking on the "SoftwareServer.bat" file in Windows or by running the "SoftwareServer.sh" file in OSX or Linux.
Before starting the Software Server one could also optionally test the server to insure that all 3rd party software is configured properly by running the Software Serever with the "-test" flag as:
```dos
> SoftwareServer -test path_to_data
```
where the _path_to_data_ argument contains a path to a folder containing test data files that can be used as inputs to the wrapper scripts used by this server. In this mode the server will not respond to external requests. Instead it will attempt to test each used program by finding for each program an input script, an output script, and an input file of a type accepted by the input script. It will run one such test for each application and deliver a report indicating which applications could be successfully utilized. Note, this is different from what is done using the ScriptDebugger tool which configures scripts to run on the system by correcting executable paths. This tool will actually try the script and catch problems that may arise as the script attempts to carry out its operation within the program.
The following illustrates an example of the output seen by running the tool:
```dos
> SoftwareServer -test data
Available Software:
ImageMagick (ImgMgk)
IrfanView (IrfanView)
Starting steward notification thread...
Software server is running...
Test files:
dae -> viper.dae
doc -> hello.doc
jpg -> hello.jpg
mp3 -> 2captain.mp3
mpeg -> may4_sm.mpeg
mpg -> may16_99.mpg
obj -> crank15k.obj
stl -> 1_5_0.stl
stp -> pump.stp
wrl -> heart.wrl
x3d -> BMP1.x3d
[localhost](0): AutoHotKey scripts/ahk-configured/ImgMgk_convert.ahk "C:\Users\kmchenry\Files\Data\Temp\SoftwareServer\Cache022\0_hello.jpg" "C:\Users\kmchenry\Files\Data\Temp\SoftwareServer\Cache022\0_hello.bmp" "C:\Users\kmchenry\Files\Data\Temp\SoftwareServer\Temp022\01285709321712_" .
[localhost](1): AutoHotKey scripts/ahk-configured/IrfanView_convert.ahk "C:\Users\kmchenry\Files\Data\Temp\SoftwareServer\Cache022\1_hello.jpg" "C:\Users\kmchenry\Files\Data\Temp\SoftwareServer\Cache022\1_hello.bmp" "C:\Users\kmchenry\Files\Data\Temp\SoftwareServer\Temp022\11285709322232_" .
Results:
ImageMagick (convert jpg bmp) -> [OK]
IrfanView (convert jpg bmp) -> [OK]
```
###The Polyglot Steward
In the previous section we encountered something called a Polyglot Steward. Though the Polyglot Steward is usually not run on its own (therefore having no real setup), it is an important part of the Polyglot system thus we take a moment to describe it here. A Polyglot Steward, as the name implies, is in charge of supervising and distributing shared resources, specifically the services provided by a number of Software Servers. This Java class is the heart of the Polyglot system. Unlike the Software Servers which provide a uniform API to functionality within 3rd party software, Polyglot is only concerned with file format conversions and thus only the available input/output functionality.
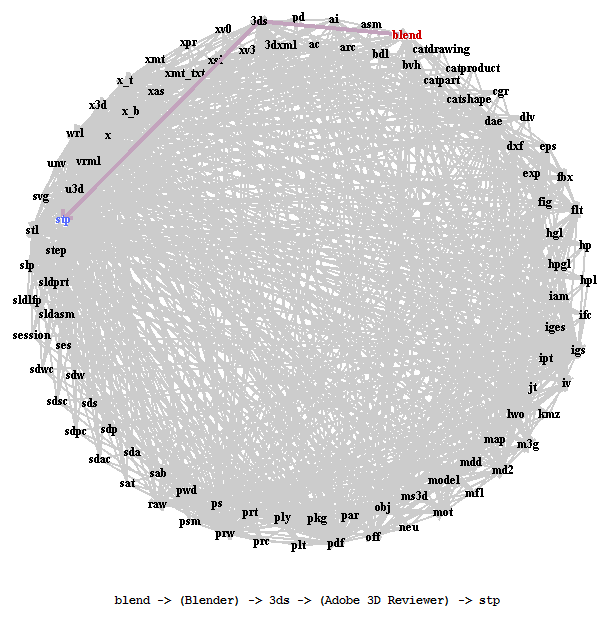
Once made aware of a Software Server the Polyglot Steward will attempt to connect to it. Once connected it will query it for all input/output operations and construct an input/output graph representing its capabilities. An input/output graph is a directed graph with file formats represented at the vertices and applications capable of converting between a particular source/target format represented as the edges. As the steward acquires and connects to more Software Servers it will merge the I/O-graphs created from their capabilities into a master I/O-graph representing the combined input/output capabilities of all the connected servers. To keep track of who does what each edge also contains a field indicating which server was responsible for it. Once created the Polyglot Steward will use this graph to service conversion requests by searching for paths within the graph from a given input format to a desired output format. An example I/O-graph is shown below.
The Polyglot Steward will attempt to load balance. Given multiple requests for the same resource the steward will first query Software Servers to see if they are busy and attempt to find alternative paths if so. In addition to constantly connecting to new Software Servers that present themselves, the steward will also constantly check to see if Software Servers are still alive, removing them if they are not. Lastly, and most importantly, is how the Polyglot Steward finds a path between formats. By default it uses the shortest non-weighted path between two formats. Though often adequate, this approach may not lead to the most optimal path given various considerations. Through tools like the IOGraphWeightsTool and information provided by the Conversion Software Registry weights can be applied to the edges to indicate various things. Of particular interest is the amount of information loss along an edge as we convert from one format to another. Given weights based on this or some other measure we can instead use a shortest weighted path to obtain conversions paths.
### The I/O-Graph Weights Tool
As mentioned in the previous section weights can optionally be assigned to the edges of the I/O-graph. Polyglot provides a tool called the IOGraphWeightsTool to measure the quality of the available conversions and conversion paths. This can be done by building a data set containing a number of sample files from a given domain, converting them to other formats, and comparing the before content to the after content. When building this data set one should keep in mind that the more files the better. On the other hand you must also keep in mind that system resources are limited and that this conversion test will attempt to convert each source file to every reachable target format (possibly multiple times) and back to the source file again. We recommend creating a directory containing 20 or so sample files for each of the supported source file formats you have data for. For the 3D domain the recommended supported source formats are: *.obj, *.ply, *.dae, and *.stp. For the image domain the recommended supported source formats are: *.jpg, *.bmp, *.gif, *.tif, *.png. Further domain and format support will be added in later versions. The reason for the restriction on the input data types is that in order to compare the content lost during the conversion we must directly load the file. The difficulties in supporting all existing file formats is the reason we have argued for software reuse and the reason we created Polyglot thus we can only load a relatively small number of formats directly. These example files will be converted to ALL reachable target formats in the I/O-graph and then converted back to the original source format. Because we can load this format we can open the file and compare its contents by some set measure and incorporate this value to all edges on the path used by his conversion.
Once the data set is created we can configure the IOGraphWeightsTool by editing the "IOGraphWeightsTool.conf" file and setting the values appropriately:
* **SoftwareServer**
* This parameter should be set to the IP address and port for a Software Server. Assuming the Software Server is active the tools Polyglot Steward will automatically connect to this server on startup (even if the Software Server isnít broadcasting its existence) . This parameter should be set in the form "ip:port". By default this is set to "localhost:50000". This parameter can be duplicated on multiple lines within the *.conf file in order to connect to several Software Servers.
* **TestPath**
* A folder that can be used to store intermediary files and overall results. By default this is set to "tmp/IOGraphWeightsTool" which is relative to the installation directory. This directory should be created for you when you unzip the archive.
* **RetryLevel**
* Since these conversions tests can be lengthy the tool will save out partial results to prevent total data loss in the event of a failure. The retry level indicates what should be done with these partial results when the tool is restarted. A value of "0" indicates nothing should be done with incomplete conversions and the tool should move on. A value of "1" indicates the tool should redo all conversions, ignoring partial results. A value of "2" indicates that partial conversions should be re-attempted. A value of "3" indicates that failed conversions should be re-attempted. By default this value is set to "3".
* **Threaded**
* Set to "true" if the tool should attempt multiple test conversions simultaneously. By default this value is set to "false".
* **DataPath**
* The folder containing the test data. The test data should be contained in sub-folders named in caps for the file types they hold. For example *.jpg files should be within a "JPG" folder. By default this parameter is set to "data" which is a relative folder within the installation directory that should have been created when the archive was unzipped.
* **Adapter**
* For more information about this value please refer to the accompanying Versus usage manual. Versus is a framework for content based comparisons. The adapter is the method that will be used to load content from the given files. By default this is setup for images and set to "BufferedImageAdapter".
* **Extractor**
* For more information about this value please refer to the accompanying Versus usage manual. Versus is a framework for content based comparisons. The extractor is the method that will be used to extract features and a numerical signature describing the file's content. By default this is setup for images and set to "ArrayFeatureExtractor".
* **Measure**
* For more information about this value please refer to the accompanying Versus usage manual. Versus is a framework for content based comparisons. The measure is the method used to compare two file content signatures, returning a value indicating how similar their contents are. By default this is setup for images and set to use "NormalizedCrossCorrelationMeasure".
* **WeightFunction**
* This value exists a means of normalizing results from the comparison measure used and contains a function in string form that should be applied to the output measure value. The "x" variable should be used to indicate this measure value. By default this is simply set to "x" indicating that the value should be used with no modification.
* **InvalidValue**
* This value will be used to indicate an incomplete conversion result (or a total loss in information). By default this value is set to "0".
* **Extension**
* The source input type that should that will be used. At the moment only one source input format can be used at a time. Regardless, results from separate runs using different source formats can be merged by simply concatenating the generated results files. By default this is set up for images and to the use the "jpg" extension.
After being properly configured the tool can be started by double clicking on the "IOGraphWeightsTool.bat" file in Windows or by running the "IOGraphWeightsTool.sh" file in OSX or Linux. You can load an alternate folder containing your data set by going to the "File" menu and selecting "Open".
To create a new test, press the "New Test" button. This will create a folder in the "TestPath" directory where all intermediary files and results will be placed. Note, the tool will search for a previous test when it is started and display the information of the newest test if one is found. This allows for further processing of older, possibly incomplete, tests. If a different test is desired you will also have to press the "New Test" button. On the left half of the window you will see the files included in the test. You can remove a handful of files from the test by pressing "Ctrl" and clicking on the files you want excluded (indicated by slashed file names). On the right you will see the conversion paths that will be used during the test. Initially all paths will be colored white. When the path is submitted for execution it will be highlighted blue. When the conversion path has finished running its color will change to indicate success/failure based on the number of files successfully converted. If all files were converted, indicated by non-empty output files, the path will be colored green. If only some were converted the path will be colored yellow. If all failed, the path will be colored red. Based on these results you can decide whether or not you should run the test again. You can execute the conversions by clicking on the "Run Conversions" button. You can press this button again after a completed test to attempt and rerun paths that failed. Note, this conversion step takes some time.
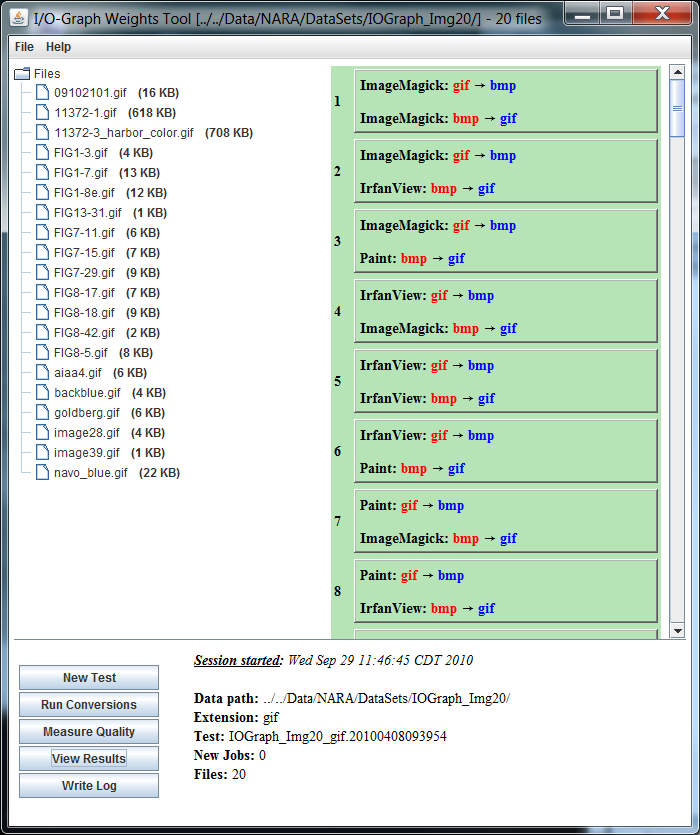
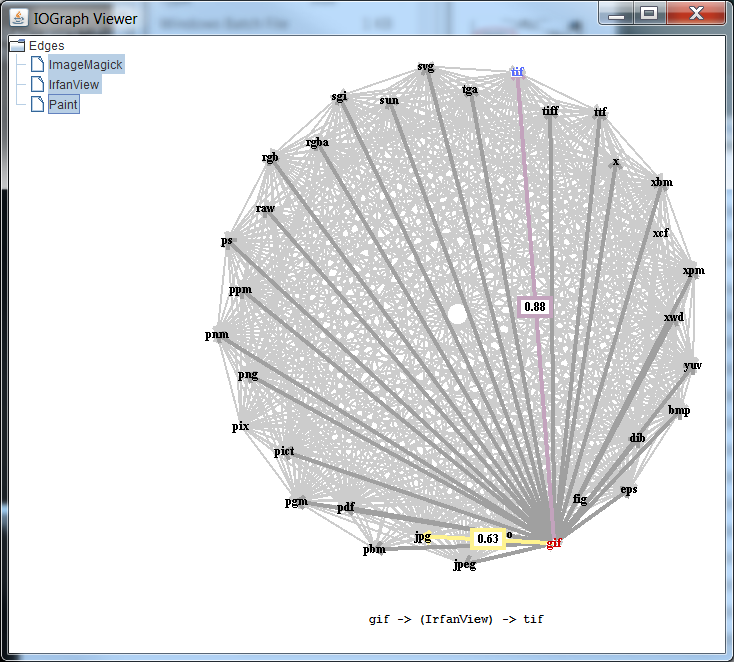
Once the conversion step is completed the test folder will contain a folder for each path containing files in the respective target formats. To measure the quality of these conversions, press the "Measure Quality" button. This will compare the original files with each of these target files to create a file "quality.txt" containing the information needed to weight the I/O-graph. The "Write Log" button allows you to save the information displayed in the lower panel. The "View Results" button displays the weighted I/O-graph.
###Polyglot Server Setup
The Polyglot Server is responsible for performing conversions between file formats by utilizing the capabilities of a number of Software Servers registered to an instantiated Polyglot Steward. The Polyglot Server can run on a separate machine or on the same machine as one of the Software Servers. Before starting the server the following parameters in the "PolyglotServer.conf" file should be set to valid values:
* **Port**
* The port this server should use. One should make sure that this port is open within their firewall and forwarded correctly if this server will be running behind a router. By default this port is set to 50002 which should be fine (i.e. available) in most cases. This port should be different from that used by the Software Servers.
* **StewardPort**
* The port the Polyglot Steward should use to listen for active Software Servers. As mentioned before a Polyglot Steward is responsible for collecting a number of Software Servers and utilizing their combined functionality to perform conversions. The Polyglot Server will use this steward to actually perform requested conversions. By default this port is set to 50001 which should be fine (i.e. available) in most cases. This port should be different from those used by the Software Servers and the Polyglot Server.
* **SoftwareServer**
This parameter should be set to the IP address and port for a Software Server. Assuming the Software Server is active the Polyglot Server will automatically connect to this server on startup (even if the Software Server isnít broadcasting its existence) . This parameter is optional and by default this parameter is commented out (comments use the Ď#í sign). If set this parameter should be set in the form "ip:port". This parameter can be duplicated multiple times to connect to several Software Servers.
Once properly configured the server can be started by double clicking on the "PolyglotServer.bat" file in Windows or by running the "PolyglotServer.sh" file in OSX or Linux. Polyglot Servers can be connected to by Polyglot Clients which will be discussed later on.
### Polyglot Web Server Setup
The Polyglot Web Server provides web browser access to the conversion capabilities contained within an instantiated Polyglot Steward (as opposed to the Polyglot Clients required by the above described Polyglot Server). The Polyglot Web Server can run on a separate machine or on the same machine as one of the Software Servers. The machine that runs the Polyglot Web Server must also run an actual conventional web server. We recommend Apache which can be downloaded freely from http://www.apache.org. You will also need to install the PHP module which can be downloaded from http://www.php.net. Once the web server is installed you will need to copy the web interfaces *.html and *.php files to the correct directory so that they will be accessible over the web. This is done by copying the "web/polyglot" folder contained within the Polyglot zip file to the web servers public folder. On Windows this is usually by default "C:\Program Files\Apache Software Foundation\ApacheX.X\htdocs" (where X.X is the version of Apache). On Ubuntu this is usually by default "/var/www". If these default directories are valid then one can simply run "InstallWeb.bat" or "InstallWeb.sh" on a Windows or Linux machine respectively in order to install the web component. Lastly the "iograph.html" file needs to be edited to point to a Polyglot Server providing the graph data. To do this edit the "url" applet parameter to point to the correct Polyglot Server:
```
<applet code = "lib" ...
<param name="url" value="host:port">
...
</applet>
```
After the web server is installed and the interface files copied over we are ready to start the Polyglot Web Server which will monitor the "uploads" folder in the public folder for files to convert. Before starting the Polyglot Web Server the following parameters in the "PolyglotWebServer.conf" file must be set to valid values:
1. **PolyglotPath**
* The Polyglot Web Server works by examining a folder for files uploaded through the web interface. This parameter should point to the root folder containing the web interface *.html and *.php files, the upload folder, download folder, etc... This parameter MUST be set to a folder in your web server's public folder which contains the necessary files.
2. **SoftwareServer**
* This parameter should be set to the IP address and port for a Software Server. Assuming the Software Server is active the Polyglot Web Server will start up its own instance of a Polyglot Steward and automatically connect it to this server on startup (even if the Software Server isnít broadcasting its existence) . This parameter is optional and by default this parameter is commented out (comments use the Ď#í sign). If set this parameter should be set in the form "ip:port". This parameter can be duplicated multiple times to connect to several Software Servers.
3. **PolyglotServer**
This parameter should be set to the IP address and port for a Polyglot Server. Assuming the Polyglot Server is active the Polyglot Web Server will start up its own instance of a Polyglot Client and automatically connect it to this server on startup. This parameter is set by default to local host on port 50002 assuming that a Polyglot Server is running on the same machine. This parameter cannot be set simultaneously with the SoftwareServer parameter. One or the other should be used. One should also note that for the I/O-Graph to function within the web interface, "iograph.html", a Polyglot Server must be used to respond to graph queries.
4. **SleepLength**
* The length of time in milli-seconds to sleep before re-checking the upload folder. The Polyglot Web Server continuously checks the upload folder for new files to convert. This can be wasteful with regards to system resources so the process should sleep before searching again. By default this is set to 1 second. Note, longer sleep times will also result in slower user response times (as it will take longer for the system to find newly uploaded files).
Once properly configured the server can be started by double clicking on the "PolyglotWebServer.bat" file in Windows or by running the "PolyglotWebServer.sh" file in OSX or Linux. Polyglot Web Servers can be accessed by any modern web browser as discussed later on.
## Clients
### Software Server Client
Though the primary purpose of the Software Server Clients are to provide a Java API for 3rd party software, they can be executed directly to provide a command line interface to this software as well. To start a client session simply use the "SoftwareServerClient.bat" file on Windows and the "SoftwareServerClient.sh" file on Mac or Linux. The clients should be executed with one or two arguments indicating the host:port to connect to and a path to data that you wish to use during the session:
```dos
> SoftwarServerClient localhost:50000 -cwd data
softwareserver>
```
Where the "-cwd" flag indicates that the next argument will set the current working directory. Note by default the Software Server will be set to "localhost:50000" and the data path to your actual current working directory. Once the program starts it will present you with an "softwareserver>" prompt where you can now enter commands. The Software Server Client session will accept the basic Linux folder traversal commands such as: "pwd", "ls", and "cd". The complete list of accepted commands is listed below:
* **help**
* List the software and operations available on the Software Server.
* **pwd**
* Print the current working directory.
* **ls**
* List the files in the current working directory.
* **cd [path]**
* Change directories.
* **send [file]**
* Send a file to the Software Server.
* **retrieve [file]**
* Retrieve a file from the Software Server and place it in the current working directory.
* **tasks**
* Begin listing a number of tasks to execute on the Software Server. This is the main means of executing jobs from a Software Server Client session and will be described in detail within the text below.
* **exit**
* Exit the Software Server Client session.
The main means of executing jobs on the Software Server is to use the "tasks" command:
```
softwareserver> tasks
task 1>
```
When issued a new prompt will appear asking for the first task to execute. Tasks are entered one per line and are of the form:
```
Software_Alias Operation Input Output
```
The software alias and available operations can be obtained from the "help" command. The inputs and outputs are just files. Depending on the operation both, one, or neither may be required. In such events where both arenít required an empty string, "", can be used in its place. When specifying files it is important to append a "./" for files that are local on your current system and append nothing if the file is currently cached on the Software Server. The following illustrates a common task of using more than one software package to convert a file from one format to another (converting "heart.wrl" to "heart.stp"):
```
softwareserver> ls
heart.wrl
softwareserver> tasks
task 1> Blender convert ./heart.wrl heart.stl
task 2> A3DReviewer open heart.stl ""
task 3> A3DReviewer export "" heart.stp
task 4> end
softwareserver> ls
heart.stp
heart.wrl
```
Note that the last produced output file is automatically downloaded and placed in the current working directory.
### Polyglot Client
Like the Software Server Client the Polyglot Clientís primary purpose is to provide a Java API to conversions provided by an underlying set of Software Servers. However, it too can be can be executed, this time on the command line, to convert an input file from one format to another. Executing the Polyglot Client requires minimal configuration. Specifically before running it edit the file "PolyglotClient.conf" and set the parameter "PolyglotServer" to point to the "host:port" of an actually running Polyglot Server. On Windows the Polyglot Client will be run with the "PolyglotClient.bat" file and on Mac and Linux with the "PolyglotClient.sh" file. The Polyglot Client should be run with three arguments: the input file, the output format extension, and the output path:
```dos
> PolyglotClient hello.jpg gif ./
```
### Polyglot Panel
The Polyglot Panel is similar to the Polyglot Client executable in that it allows you to convert local files using a Polyglot Server. The difference however is that the Polyglot Panel provides a GUI for doing this. The GUI is similar to that of a common GUI file manager with files presented in a window that can be selected, clicked, and modified. Again minimal configuration is required before running the program. To configure the tool edit the file "PolyglotPanel.conf" and again point the "PolyglotServer" parameter to the "host:port" of a running Polyglot Server. From here you can also set the "DefaultPath" to a folder you would like to initially start in. An an example of a Polyglot Panel is shown below.
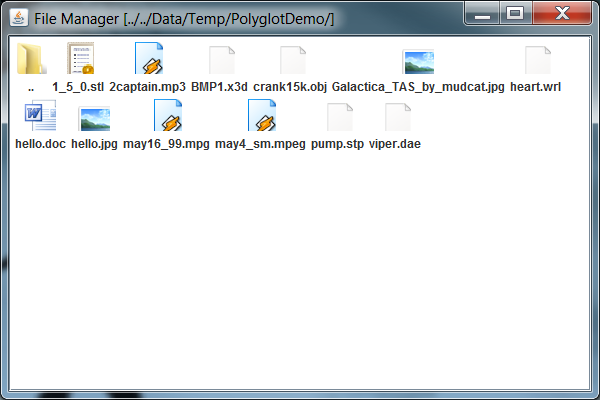
You can navigate folders by double clicking on the presented folders (e.g. ".."). A file can be converted by right clicking on it and selecting the desired output format from the presented popup menu.
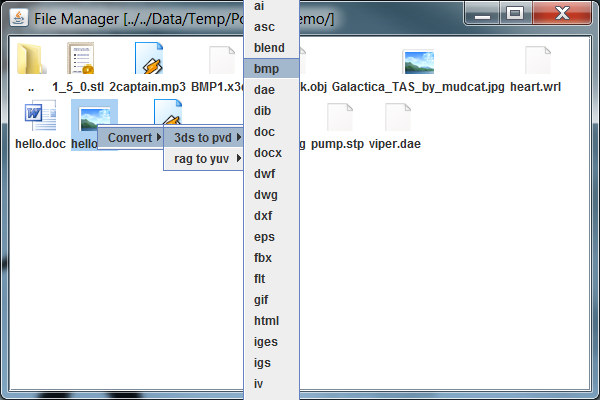
Note, this popup menu is generated according the file type of the selected file. Specifically, the output formats presented are those reachable from the files input format according to the Polyglot Servers I/O-Graph. Multiple files can also be converted simultaneously by dragging a box around several files and right clicking. Again, the popup menu only presents reachable output formats. This time, with multiple files selected, it will present the intersection of the reachable output formats given that the input files may be of differing formats.
### I/O-Graph Panel
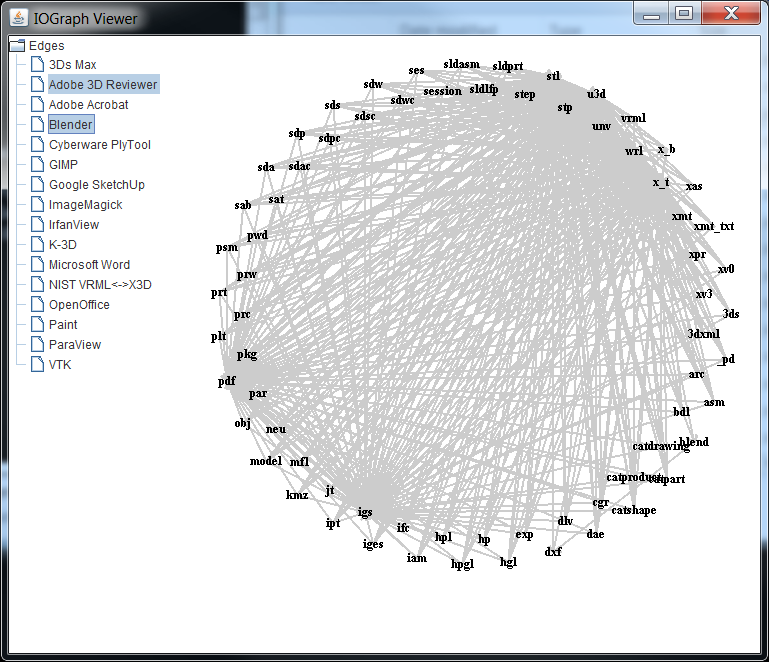
An I/O-Graph Panel is a tool which allows you to view the I/O-Graph on a remote Polyglot Server. On windows it can be run from the "IOGraphPanel.bat" file while on Mac and Linux it can be run from the "IOGraphPanel.sh" file. This tool takes one argument, the "host:port" of the Polyglot Server to connect to. An example of its use is shown below:
```
> IOGraphPanel localhost:50002
```
The resulting panel is shown below. The I/O-Graph Panel supports all the graph visualization options discussed in detail in the "Web Interface" section to follow.
### Web Interface
The web interface consists of three components: the "Conversion Graph", "Convert", and "View". The "Conversion Graph" component allows for the inspection/verification of a conversion path between and source and target file format given the available 3rd party applications. The "Convert" component provides a sort of "universal converter" based on the capabilities of the underlying software packages. From here a user can upload files, convert them to a selected target format, and download the produced results. The "View" component uses this "universal converter" to provide a sort of "universal viewer". From here users can upload files and preview them regardless of the format. We will discuss each component in more detail below.
#### Software Requirements
In order to use the applets within the interface you must ensure that the Java Runtime Environment is installed on your system. To view 3D models using the "View" tab it is required that you install the Java bindings for OpenGL (JOGL, http://jogamp.org/jogl).
#### Accessing the Web Interface
Begin by opening your browser and going to the URL of the server running the Polyglot Web Server (e.g. the NCSA Polyglot Server: http://polyglot.ncsa.illinois.edu). You should be prompted for permission to run the java applets on the page. The applets require extra permissions in order to allow for the drag and drop interface for uploading files to the service. To continue using the web interface, click on the "Run" button.
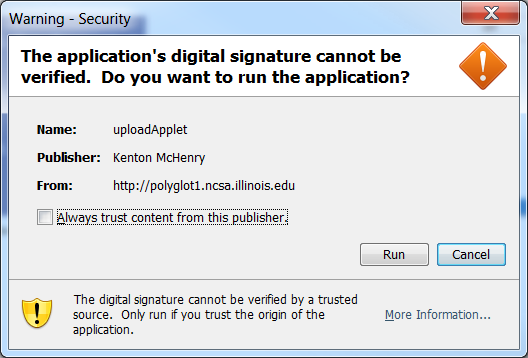
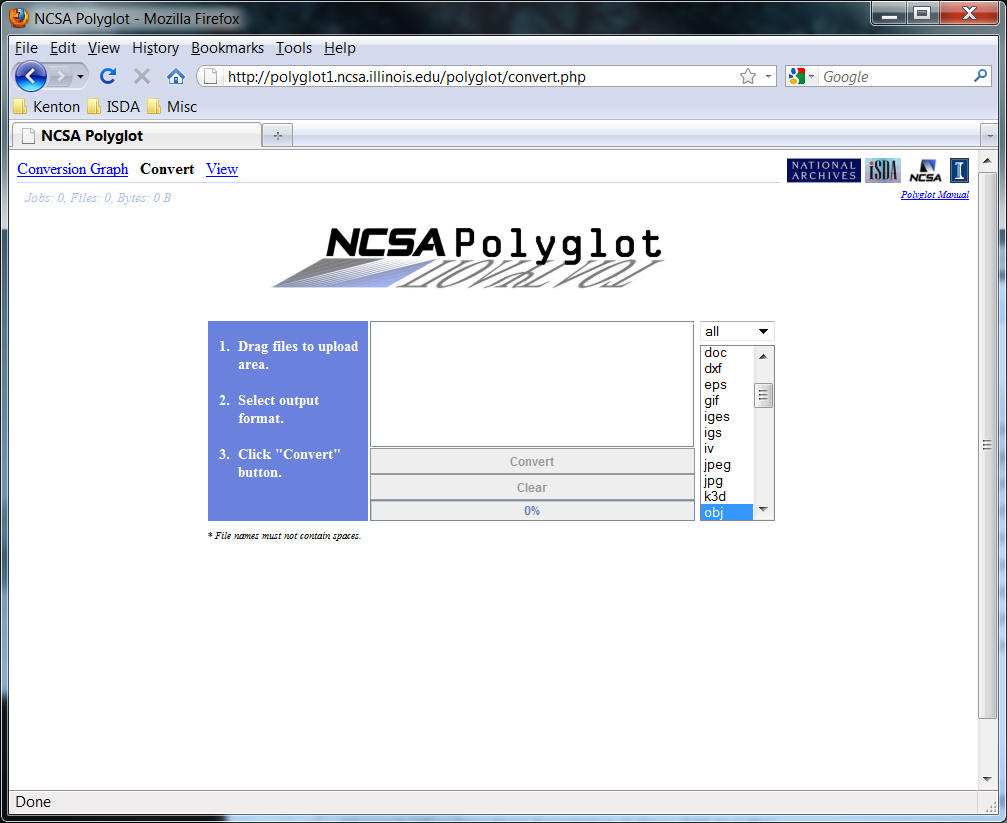
If you check the "Always trust content from this publisher" box you will not be prompted for permission to run applets from this site in the future. Once permission is given you will see the front of the web interface. You will automatically be within the "Convert" tab. The reason for this is to provide quick access to the conversion capabilities of the Polyglot service. However, when first using the services of a particular Polyglot Web Server you should access the "Conversion Graph" tab (discussed in the next section) to check what 3rd party software is available for conversions and what conversion paths (i.e. source/target format options) are available.
#### Conversion Graph Page
The "Conversion Graph" component allows users to inspect which 3rd party applications are available and what conversions are capable of being performed. The available 3rd party applications are presented at the left of the presented web page. The I/O-Graph made up form selected applications is displayed at the center of the page. To re-iterate, the vertices of this graph represent the union of the formats supported by the installed 3rd party applications. The directed edges within the graph represent an application capable of converting from a source format A to a target format B.
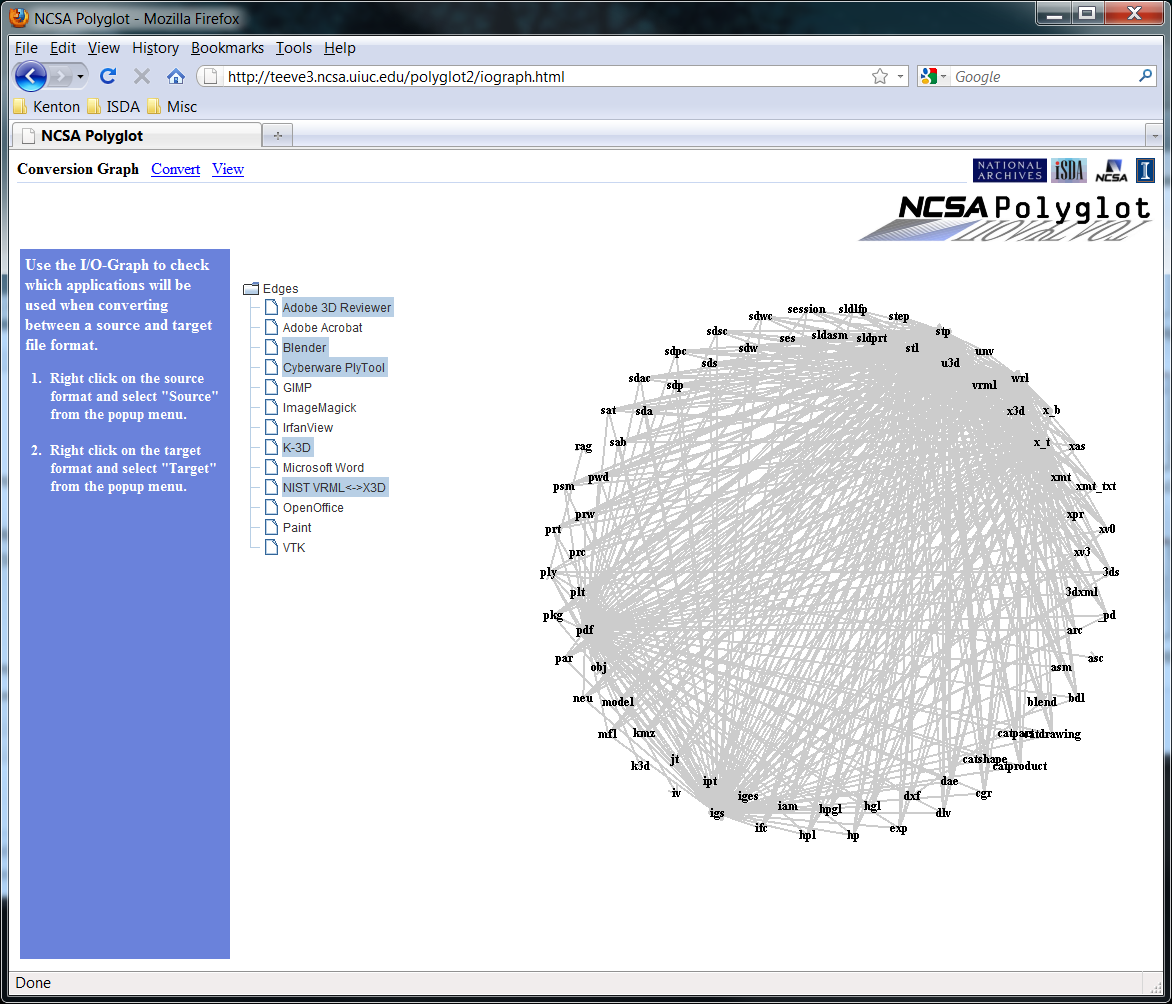
The displayed I/O-Graph allows users to inspect several useful pieces of information about the available services. Likely the most import is whether or not a conversion path exists between a given pair of formats. To check this a user should right click on the format that is to be the desired source format. When this is done a popup menu will appear. To identify this format as the source simply select "Source" from this menu.
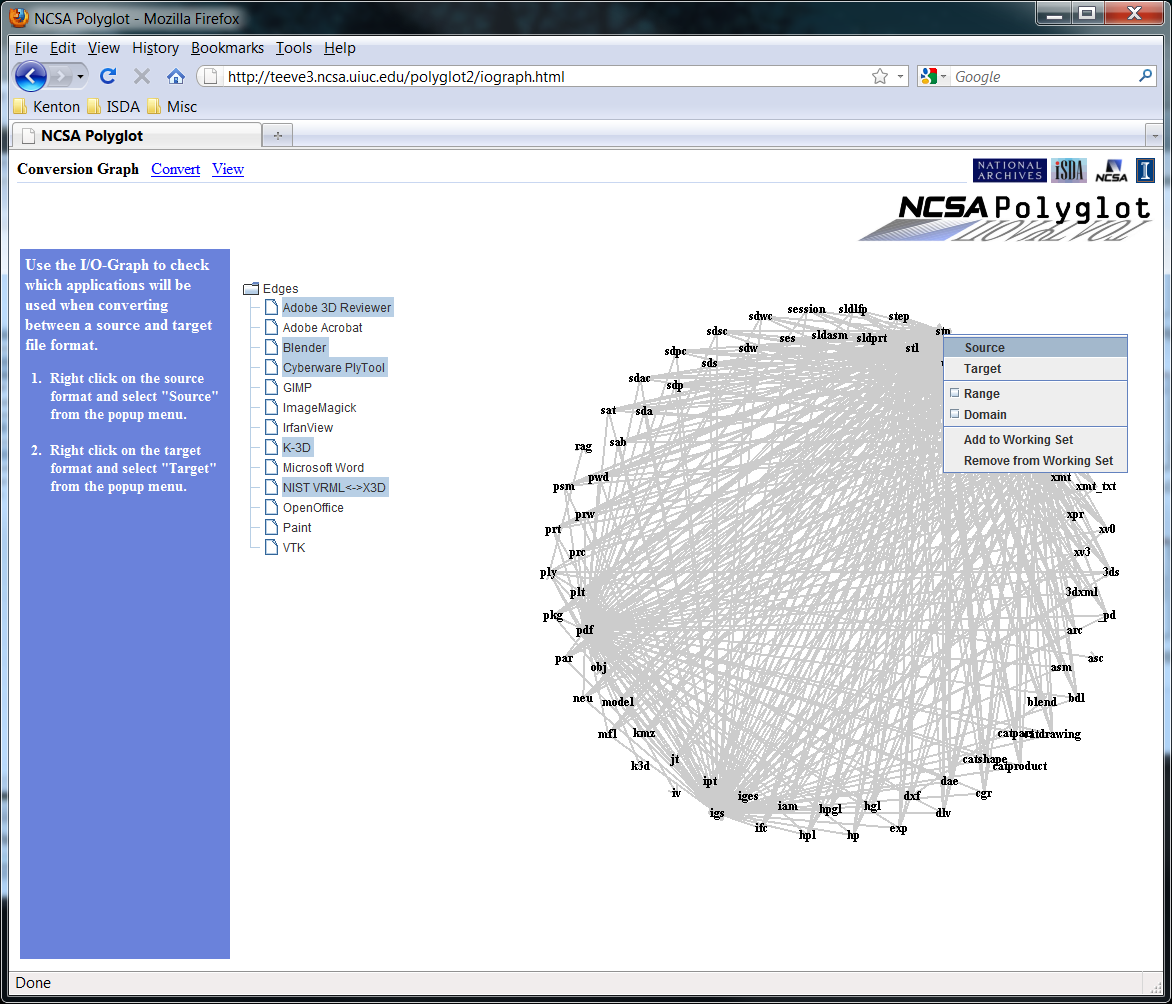
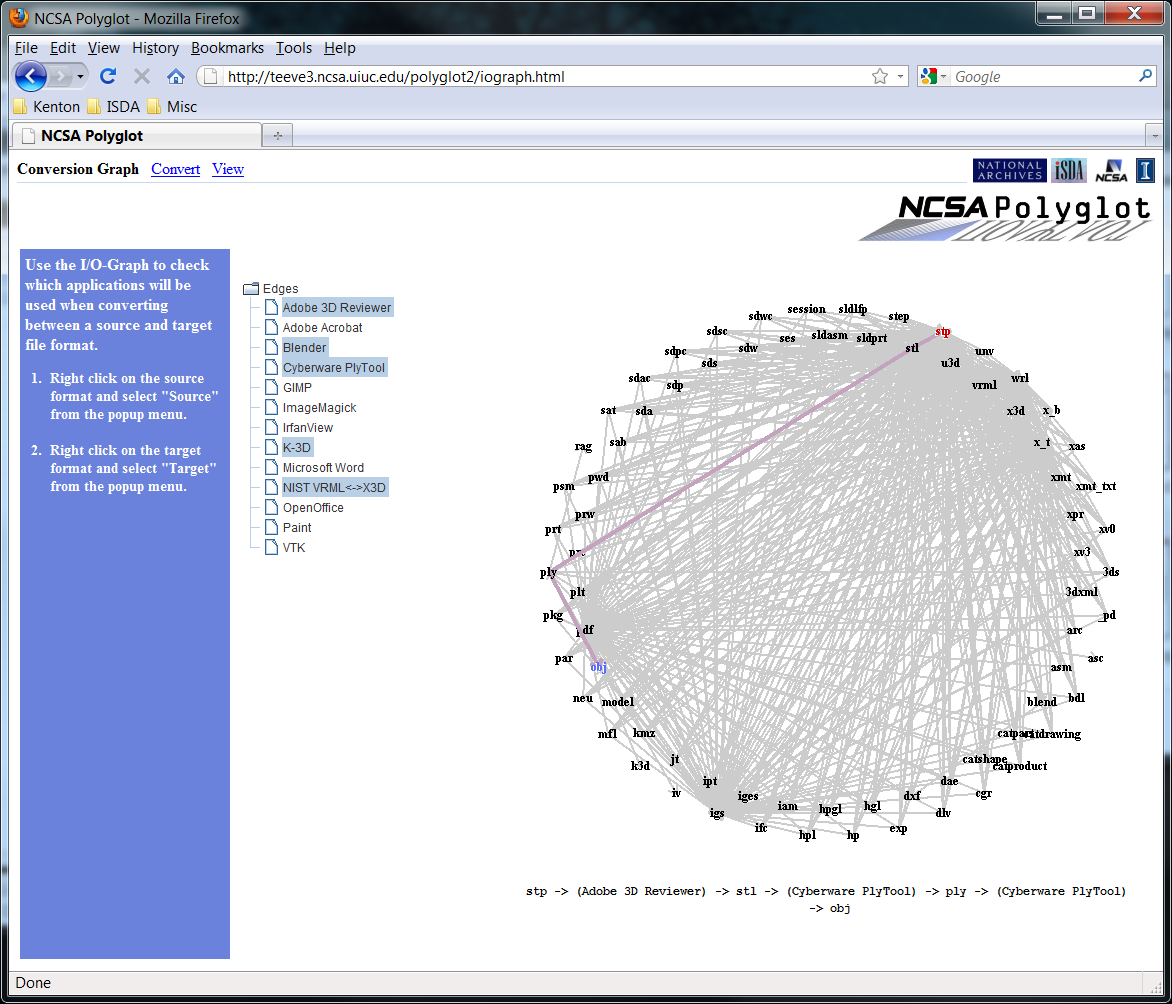
This process should then repeated over the desired target format, this time selecting "Target" from the popup menu. If a path exists it will be highlighted and displayed below the graph. If multiple paths exist only the shortest one will be displayed (i.e. the one using the fewest number of applications). An example of a user checking on a conversion between the *.stp and *.obj file formats can be seen below.
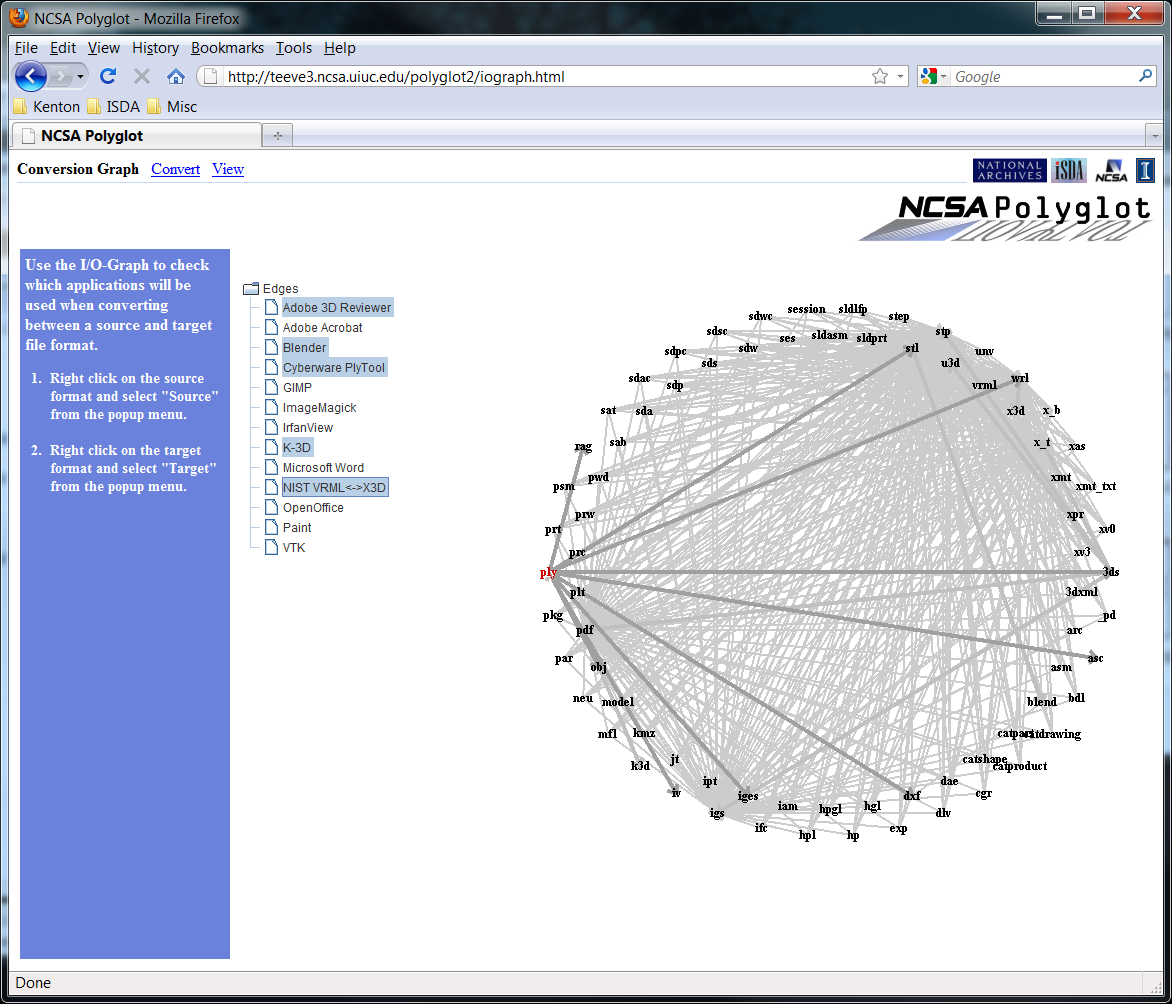
Other options include viewing the "Range" from a selected source format. This option will indicate through thicker edges all formats reachable from the selected source format (i.e. formats that it can be converted to).
The "Domain" option allows a user to see all formats that can be converted to the selected target format. If a format cannot be converted to the target format it will be grayed out.
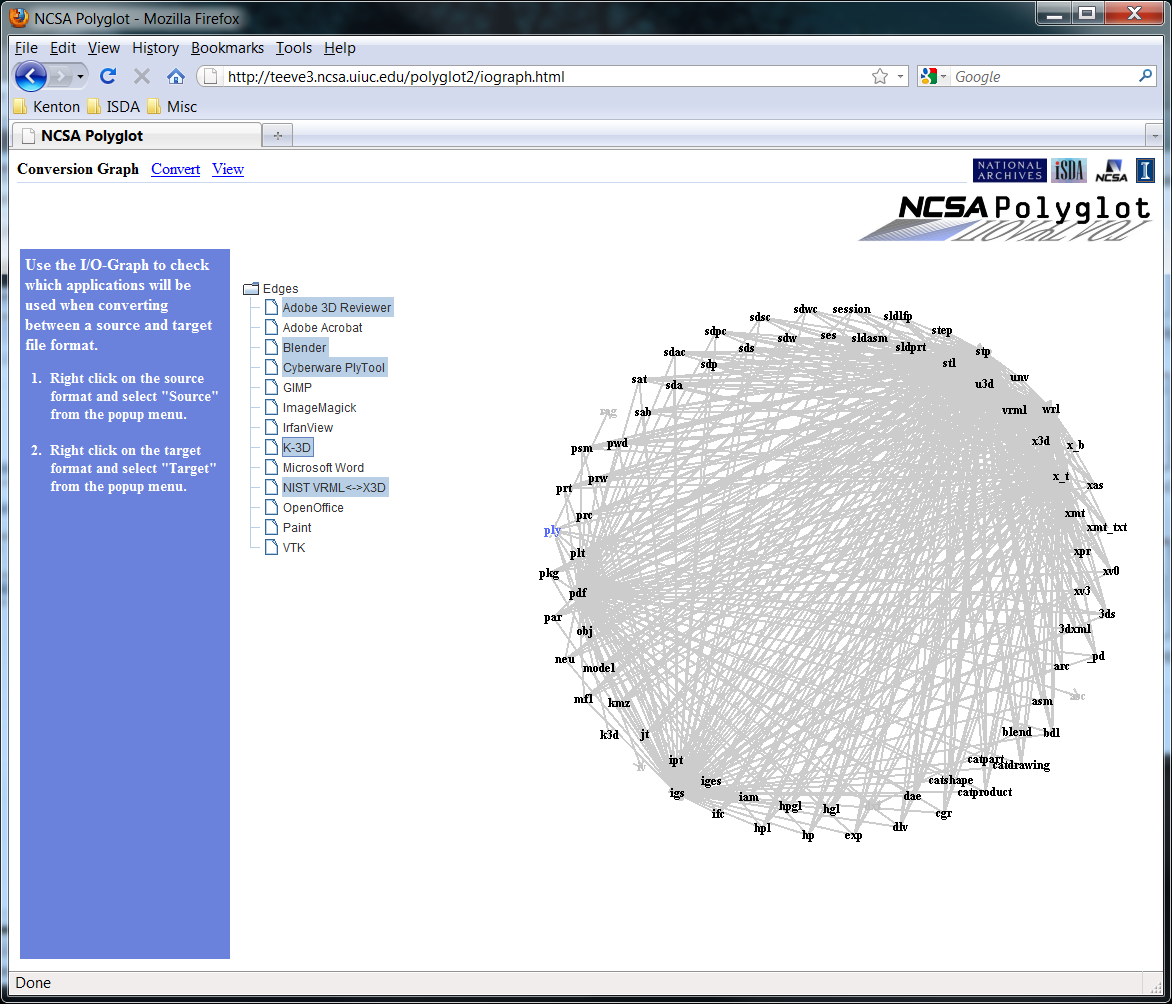
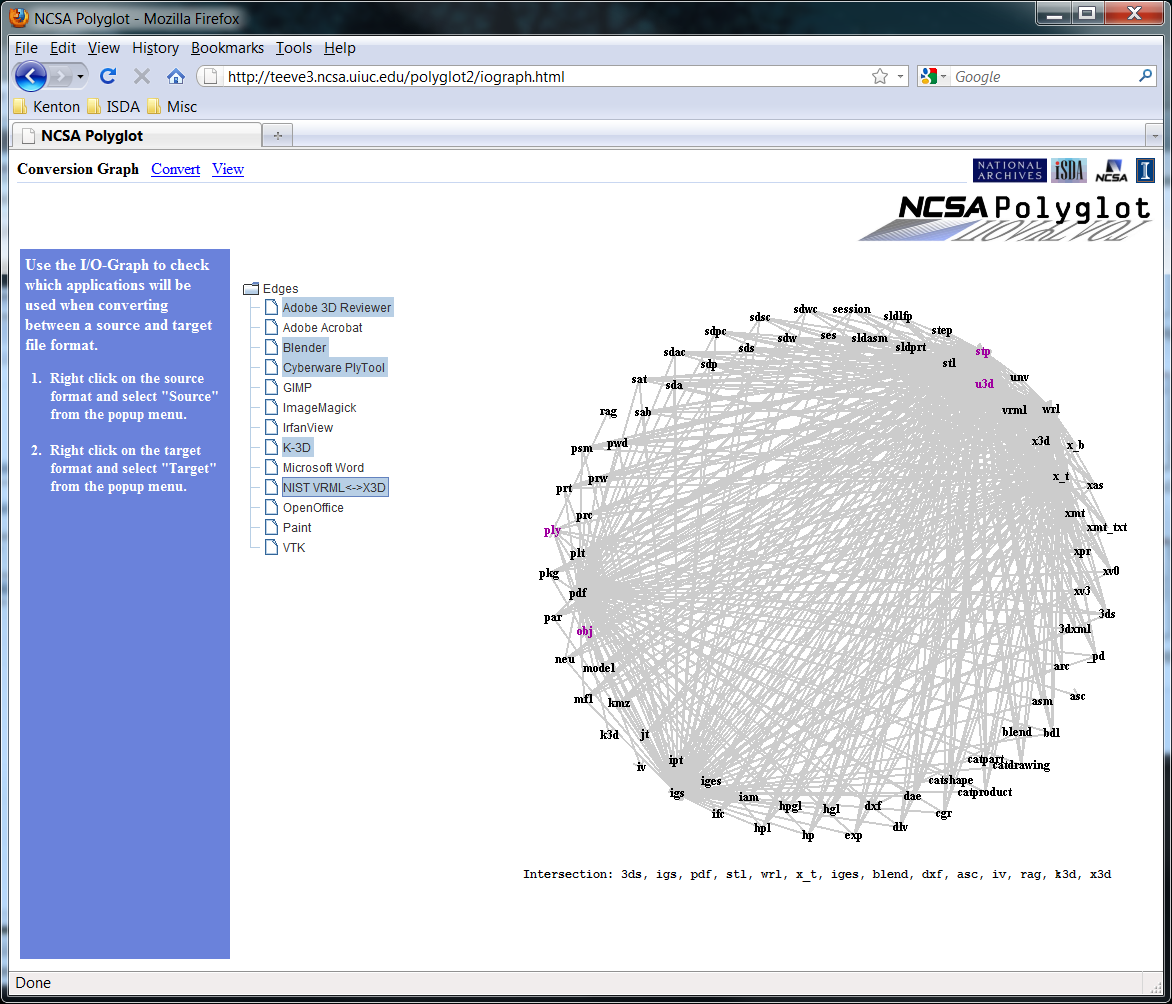
The "Working Set" allows users to select a group of file formats and view a list of formats that are commonly reachable by all of them. To add a format to the working set, simply select "Add to working set" from the popup menu. The format should then be highlighted purple. All reachable formats will be displayed as the "Intersection" of their range below the graph. To add more formats simply repeat the process. To remove a format from the current working set simply right click on that format and select "Remove from Working Set" in the popup menu.
#### Convert Page
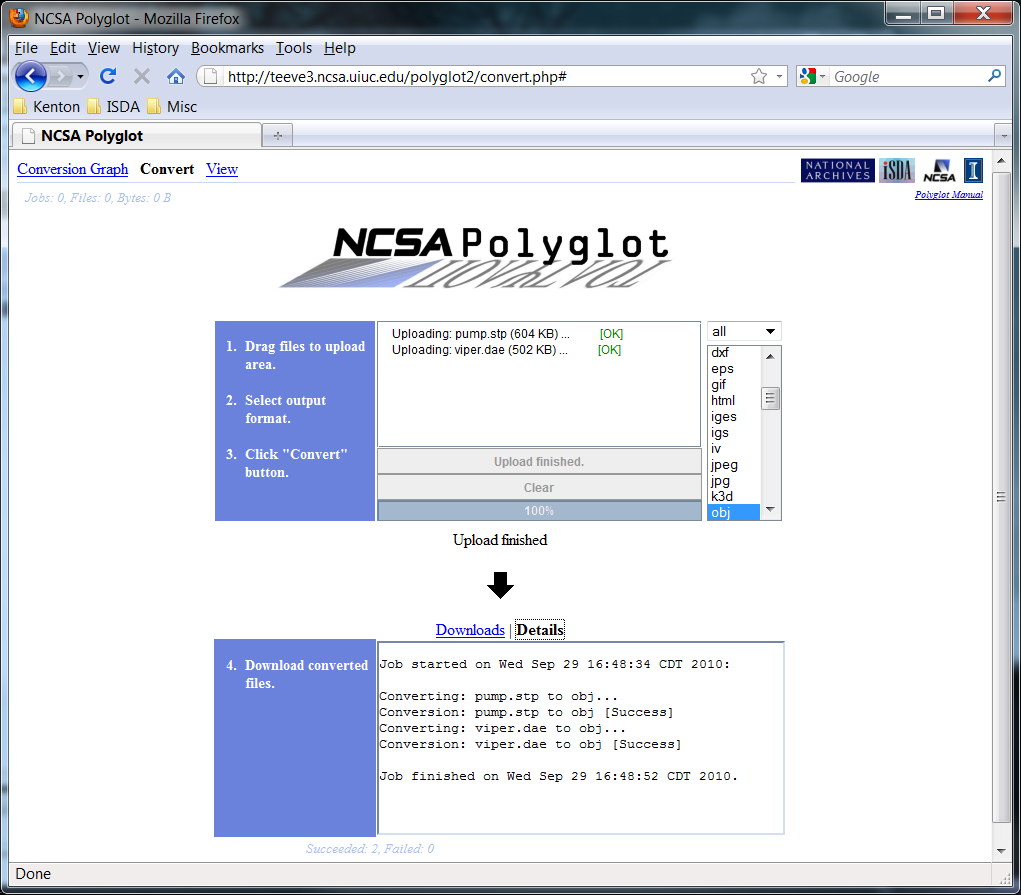
To convert files make certain that you are under the conversion tab of the Polyglot Web Interface. Either from your desktop or a file explorer, highlight the files that you would like to convert. To upload these files for conversion to the Polyglot service simply drag and drop the highlighted files into the large blank area below the NCSA logo on the conversion page (to the left of the list of file formats and above the Upload button). The files should appear in the target area as shown below.
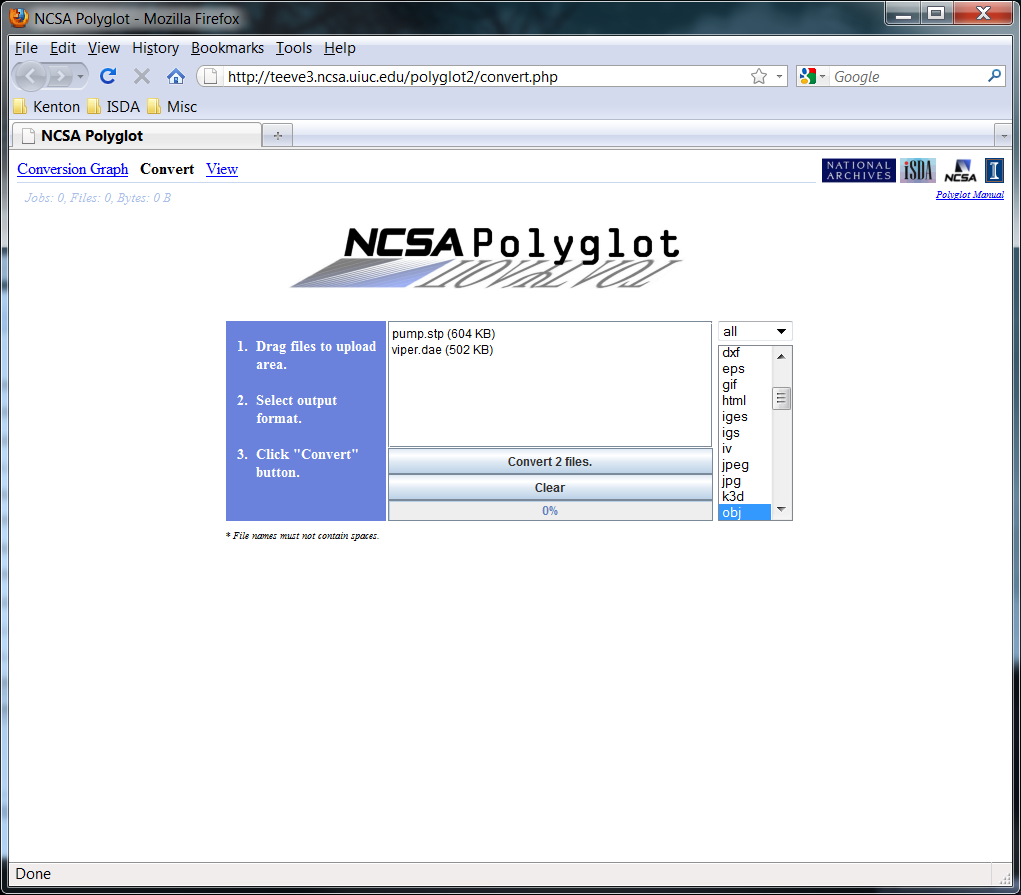
Once the files have been dragged to the upload area you can select the target file format from the scrollable list on the right. The default 3D format is the *.obj format. To change this, simply click on another format. At the top of this list you will notice a drop down menu which says "all" by default. This drop down menu allows you to filter the formats in the list below based on the data type (i.e. 3D, document, images, etc.). The default "all" shows all formats among all data types. Once the target format has been selected press the "Upload" button to transfer the files to the Polyglot Server. When the conversion is completed the resulting files will be available for download in the new area that appears below.
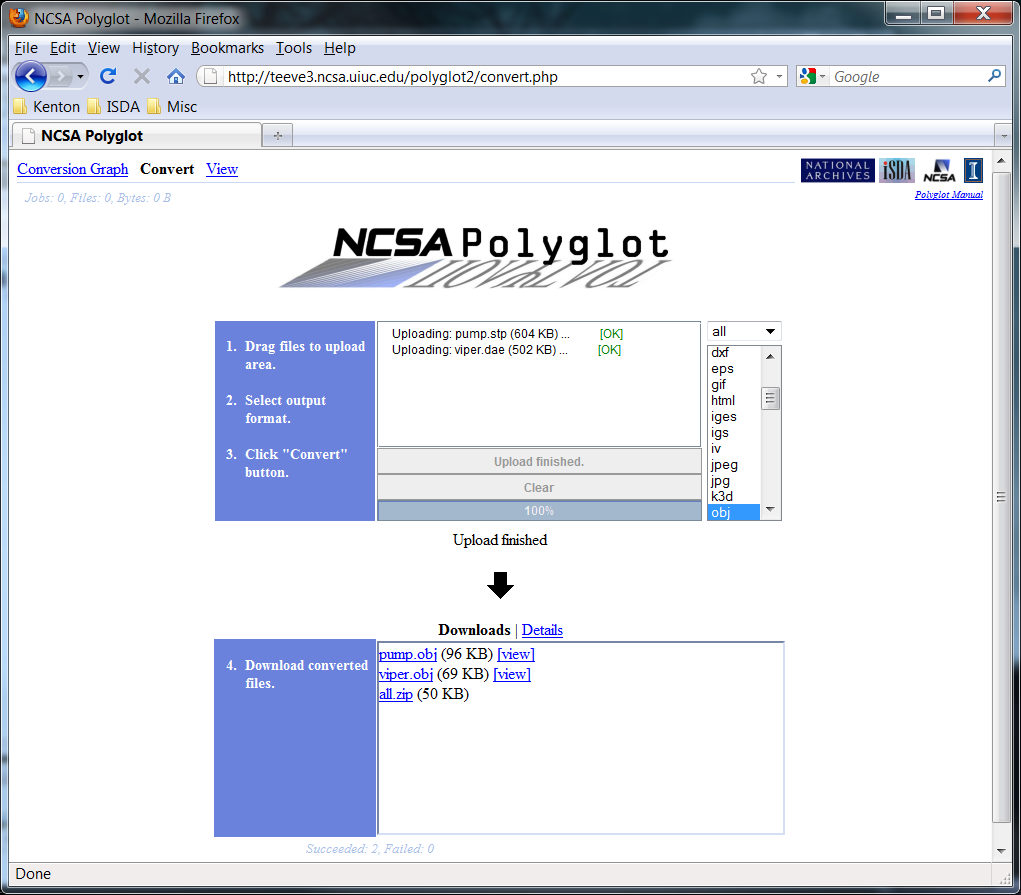
Details about the conversion can be found by clicking on the "Details" tab of the download area. One should note that the entire conversion page offers quite a bit of status information. At the upper left you will find the current number jobs in the queue, the number of files in the queue, and the total number of bytes of the files in the queue. Below the download area you will see your order in the queue if forced to wait. Once your job is picked up you will see how many of the requested conversions have succeeded. When your job is completed you will also be shown how many of your requested conversions failed. Failures can occur if a conversion path does not exist between the source format and the target format or if one of the 3rd party applications had trouble with the uploaded file (possibly having an error). When your conversion request has completed you can download your converted files and submit another conversion request simply by dragging more files into the top upload area and clicking "Upload" once again.
#### View Page
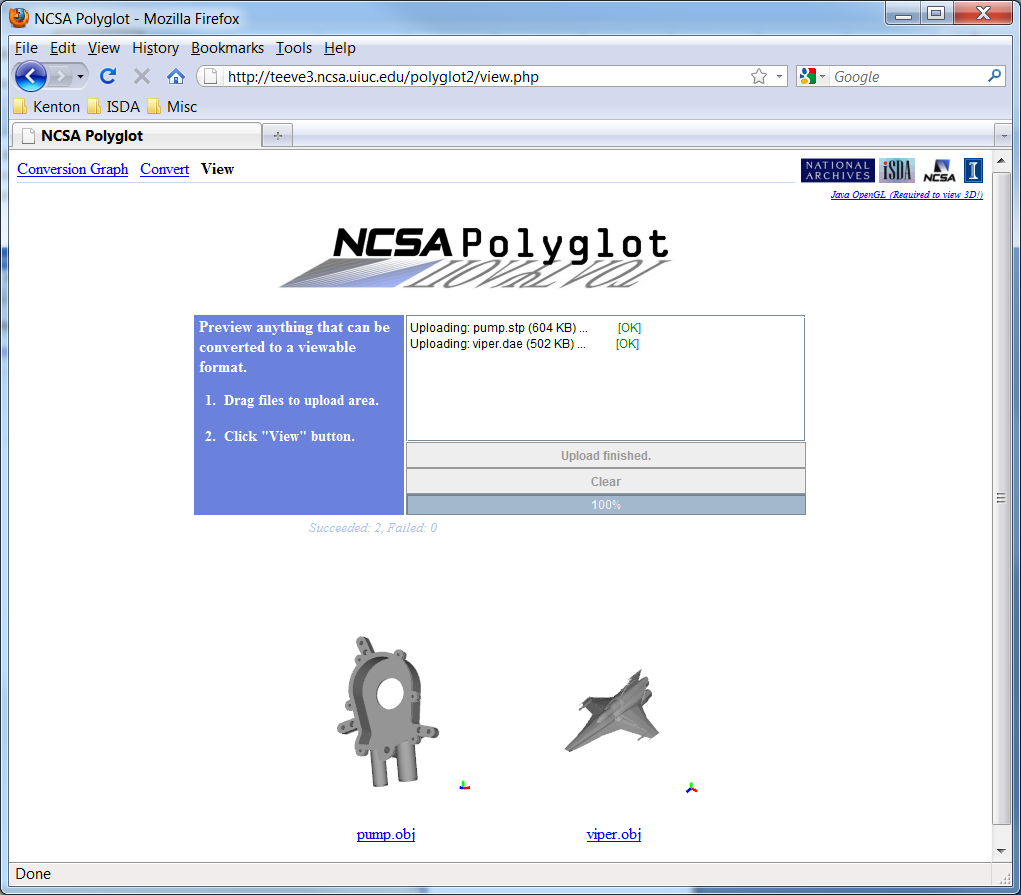
One of the most immediate benefits of having a system like this which could potentially be a "universal" converter is that you also enable "universal" viewing or previewing of data. Most applications are capable of displaying some small number of file formats. The applet that displays 3D models on the Polyglot Web Interface in fact only displays one format (the *.obj format). However, the Polyglot service allows conversions from a great number of formats to the supported *.obj format. It is in this way that the Polyglot viewer attempts to be a "universal" viewer.
To utilize the Polyglot viewer, click on the "View" tab at the top of the web interface. You will see a window much like the one displayed during conversions with one major difference in that the viewer page does not contain the scrollable list of formats to convert to.
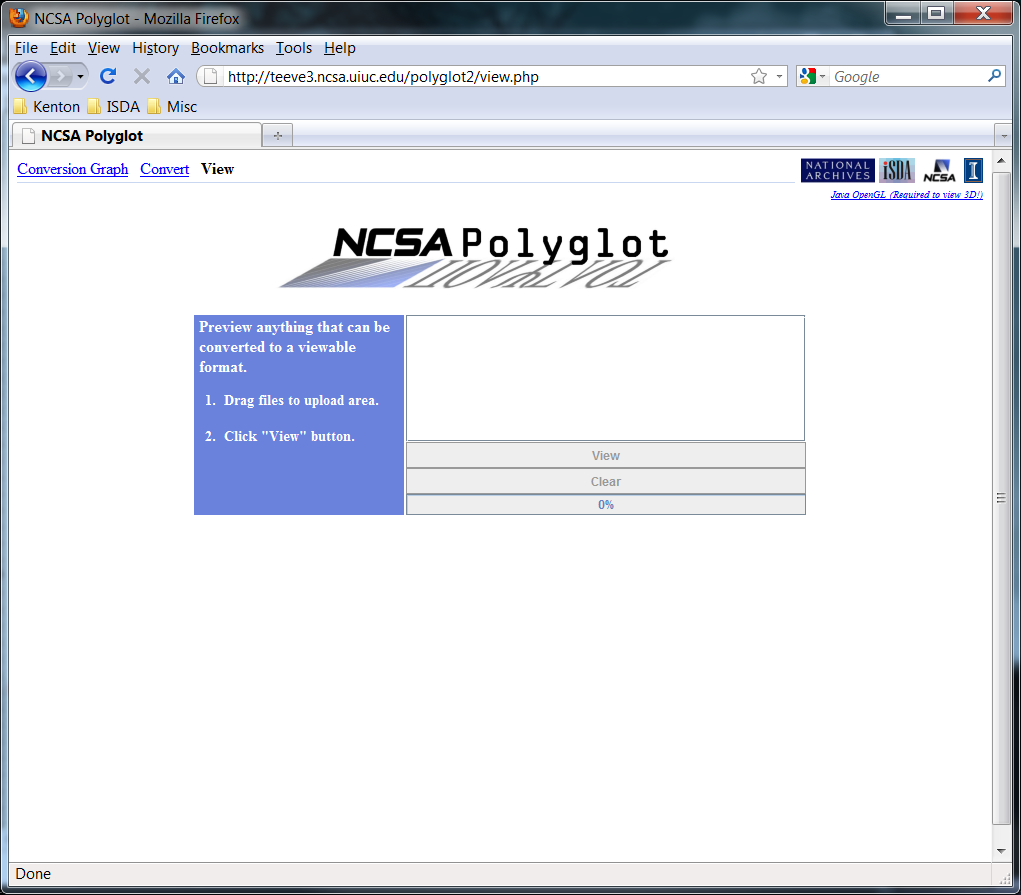
Instead the converted to format is hard coded into the page. Specifically, this format is the format supported by the viewer for that particular data type. For 3D data this is the *.obj format. For images this is the *.jpg format. For documents, this is currently the *.txt format.
Similar to the conversions page, a user can drag and drop a number of files to the upload area for viewing. After clicking on the "Upload" button the files will be sent to the Polyglot server, converted to the format which the viewer supports, and displayed in the area below.
## API
Thus far we have discussed the setting up, running, and accessing of Software and Polyglot Servers. Up until now we have accessed the capabilities of these servers with tools that we at NCSA have provided. However, the real power of these services is in allowing others to write their own programs utilizing their capabilities. This is particularly true in the case of the software reuse layer whose sole purpose is to re-introduce a programming interface to functionality locked away in compiled code.
One form of the Polyglot API is available in Java. In this document we will give a brief overview of how to use the API. For full details one should refer to the included documentation in the Polyglot "javadoc". In the examples below we will assume that there is a Software Server running on "localhost" port 50000 and a Polyglot Server running on "localhost" port 50002.
### Software Server Clients
A Software Server Client is declared as follows:
```java
SoftwareServerClient softwareserver = new SoftwareServerClient("localhost", 50002);
```
where the first constructor argument is the host name or IP address and the second argument is the port number to connect to. The client will connect to the server as soon as it is declared. To disconnect you would call the "close" method:
```java
softwareserver.close();
```
Though jobs can be sent to the Software Server several ways the most convenient ways is via the use of a "TaskList". A task list is a helper data structure that hides away much of the low level workings of the Software Server Client. A task list is declared with a Software Server Client as its only argument:
```java
Tasklist tasks = new TaskList(softwareserver);
```
Tasks can now be added to a task list via the "add" method. The below example adds three tasks to the tasklist in order to convert a local file "heart.wrl" to the *.stp format:
```java
tasks.add("Blender", "convert", "./heart.wrl", "heart.stl");
tasks.add("A3DReviewer", "open", "heart.stl", "");
tasks.add("A3DReviewr", "export", "", "heart.stp");
```
The add method accepts four arguments: the alias of the software to use, the operation to perform, an input file, and an output file. As mentioned earlier a "./", or any specified path, indicates a local file as opposed to a file cached on the Software Server. Also if both an input and output file are not required an empty string can be passed in. To execute the tasks the "execute" method should be called with optionally one argument indicating where the last generated output should be downloaded too:
```java
tasks.execute("./");
```
The files used need not be actual files within the file system. One of the things hidden by the above usage of the task list is the use of the helper "Data" class used by the Software Server Client. The "Data" class is an abstract class representing some kind of data. The two instances we will mention here are the type "FileData" and the type "CachedFileData". "FileData" represents a local file on the system and can be declared as follows:
```java
FileData file_data = new FileData("./heart.wrl", true);
```
where the first constructor argument is the local file this object represents and the second argument is true if this file should be loaded into memory. Once loaded into memory this object is in fact "the file". "CachedFileData" represents a file on a remote Software Server. These objects are usually what is returned from the Software Server. In order to download the file to the local system the file must be un-cached. Assuming we did not specify the output path for the task listís execution we would receive a cached file as the return value which we would later un-cache:
```java
CachedFileData cached_data = tasks.execute();
FileData file_data = softwareserver.retrieveData(cached_data);
```
Note that the returned file, file_data, is still not on the local file system but only in memory. To save the file to the file system we would use the save method:
```java
file_data.save("./", null);
```
where the first argument is the output path and the second argument is the file name to use. If set to "null" the file name will be based on the name of the cached file on the Software Server. These "Data" objects can be used directly to create tasks that are submitted to the Software Server:
```java
FileData file_data0 = new FileData("./heart.wrl", true);
CachedFileData cached_data1 = new CachedFileData(file_data0, "stl");
CahcedFileData cached_data2 = new CachedFileData(file_data0, "stp");
tasks.add("Blender", "convert", file_data0, cached_data1);
tasks.add("A3DReviewer", "open", cached_data1, null);
tasks.add("A3DReviewer", "export", null, cached_data2);
tasks.execute();
FileData file_data2 = softwareserver.retrieveData(cached_data2);
file_data2.save("./", null);
```
Note how the "CachedFileData" instances were first declared here, with the assumption that such a file will exist on the server. The constructor accepts two arguments, a "FileData" object which it uses to extract the name from, and a different format extension. These cached files donít actually exist on the server when they are declared here. However they will be created when the task is executed as the output from a previous task and are thus more or less place holders for that output.
Again, there are many ways of using the Software Server Client and one should refer to the java documentation for full details. We make a point to mention the use of these "Data" objects in that it may at times be desirable to write programs that donít actually interact with the local file system. An example of such a program is our own Polyglot Server, which simply routes files between machines.
### Software Server REST API
A REST API provides a flexible and convenient means for a variety of scripting and programming languages to automate software functionality made available through a Software Server. The REST interface has the form:
http://{host:port}/software/{application}/{task}/{output_format}/{input_file}
where host:port is the host and port of the running Software Server, application is the application to use, task is the task to carry out (e.g. open, save, or convert), output_format is the extension of the desired output format, and input_file is either the URL encoded URL of the file to process or ommitted if the input file is to be posted to this endpoint. The example bash script below shows the usage of the REST interface to convert all the files within a directory from one format to another:
```bash
#!/bin/bash
host="http://141.142.224.231:8182"
application="A3DReviewer"
task="convert"
output="igs"
input="stp"
url=$host/software/$application/$task/$output
for input_file in `ls *.$input` ; do
output_url=`curl -s -H "Accept:text/plain" -F "file=@$input_file" $url`
output_file=${input_file%.*}.$output
echo "Converting: $input_file to $output_file"
while : ; do
wget -q -O $output_file $output_url
if [ ${?} -eq 0 ] ; then
break
fi
sleep 1
done
done
```
Authentication can be enabled in order to restrict access to software by adding lines of the following form to the SoftwareServerRestlet.conf file:
Authentication=user:password
where user is a username and password is the password for that user. Multiple of these lines can be added in order to add multiple users. With authentication enabled the REST endpoint is accessed as follows:
http://{username}:{password}@{host:port}/software/{application}/{task}/{output_format}/{input_file}
### Polyglot Clients
Unlike the Software Server Client which gives you direct access to the 3rd party application operations, the Polyglot Client is focused specifically on performing conversions between file formats. A Polyglot Client is declared as follows:
```java
PolyglotClient polyglot = new PolyglotClient("localhost", 50002);
```
where the first argument is the hostname of the Polyglot Server and the second argument is the port to connect to. Again, the client connects to the server as soon as it is declared. To disconnect from the server the "close" method should be used:
```java
polyglot.close();
```
The Polyglot Client's purpose is to provide an interface for performing conversions and the main means of doing this is with the "convert" method:
```java
polyglot.convert("heart.wrl", "./", "stp");
```
where the first argument is the file to convert, the second argument is the output path, and the third argument is the desired output format. A list of available output formats can be obtained from the "getOutputs" methods:
```java
Vector<String> formats;
formats = polyglot.getOutputs("wrl");
```
where the argument is the source format we wish to use and the returned vector of strings is a list of file format extensions that can be reached from this format. For a complete list of methods please refer to the java documentation. However, we will briefly mention use of the Polyglot Steward. The Polyglot Client is actually an extension of an abstract class called "Polyglot". This abstract class guarantees that a handful of conversion oriented methods will be implemented. The "PolyglotSteward" class also extends this class, many times allowing the two classes to be interchanged. Recall the difference between the two. The Polyglot Client connects to a Polyglot Server which contains within it a Polyglot Steward that manages a set of Software Servers. Depending on the application it may be desirable to "remove the middle man" and instantiate a Polyglot Steward locally.
One example of why one might want to do this is to gain access to the software reuse layer functionality. For example the "Data" objects: "FileData" and "CachedFileData". Like before we may want our application to not actually access the local file system and convert files that are stored in memory using these objects. The Polyglot Steward, which accesses the software reuse layer to perform conversions, can do this through a specialized "convert" method. This is illustrated in the example below:
```java
PolyglotSteward polyglot = new PolyglotSteward();
SoftwareServer softwareserver = new SoftwareServer("localhost", 50000);
polyglot.add(softwareserver);
FileData file_data0 = new FileData("heart.wrl", true);
CachedFileData cached_data1 = polyglot.convert(file_data0, "stp");
FileData file_data1 = softwareserver.retrieveData(cached_data1);
file_data1.save("./", null);
```
## Miscellaneous
### Known Issues
When uploading files, the applet sometimes encounters the following error:
"Uploading: file.xyz (146 KB) ... An error occurred: cannot retry due to server authentication, in streaming mode"
When this occurs we recommend pressing the reload button in the browser. If that does not correct the problem then you might have to do a full reload by bypassing the cache. In this case, you will need to press "Shift" while pressing the reload button.
### Acknowledgments
The software development was partially supported by the National Archives and Records Administration (NARA). The Polyglot Web Interface makes use of the DNDApplet (http://panyasan.wordpress.com/2008/02/29/open-source-drag-drop-upload-java-applet-for-websites) to allow file uploads via drag and drop to the browser.